In spite of the fact that heat-insulated floors have obvious advantages in comparison with normal heating batteries, they take root into our life not so quickly as it would be possible to expect. Among the reasons - high cost of operation of electric floors, complexity of the device water, need of considerable capital investments. At last, lag effect and distrustfulness to all new our consciousness. And still, heat-insulated floors get into our houses more and more widely.
- – system of water heat-insulated floor;
- – gas heating boiler;
- – network gas;
- – mix for tie;
- – tool (construction, sanitary, metalwork).
1. Measure distance between concrete bed and the greatest possible level of finished floor. It will show what type of the warmed-up floor can be arranged in your apartment. Thickness of water and cable floor (without floor covering) is equal to the sum of thickness of the heatreflecting substrate and tie in which the cable or the pipeline is immured. Approximately this value is 40-50 mm. For film heat-insulated floor it is considerably smaller due to the lack of tie and subtlety of the most heating film – 10-15 mm.
2. Choose type of floor which is the most reasonable for your house. It is necessary to choose between water, cable and film floor. As a rule, the device of the first is possible only if your house is equipped with the independent gas boiler. In terms of costs of heating water floor is the most economic, at the correct device it can even be more economic than water radiators – due to optimum distribution of heat fluxes.
3. Electric floors it is simpler in the device, but is much more expensive in operation. Power of 1 m² surfaces of floor varies in the range from 50 up to 150 W. Even considering that from time to time floors will be automatically disconnected from heating by the temperature-controlled equipment, expenses on the electric power can make very large sums.
4. Clean concrete bed from all superfluous – old floor covering, garbage, the flaking fragments. If the basis damp, dry it. At considerable roughnesses (more than 3-4 mm by one meter), you vyrovnit surface by means of putty.
5. Lay on the floor the waterproofing film with overlapping of joints not less than on 100 mm, having tucked its edges on wall. Glue joints with adhesive tape. Lay on waterproofing the heatreflecting material (in particular, the foiled expanded polystyrene) metallized layer up. Further works are defined by what type of heat-insulated floor you are going suit.
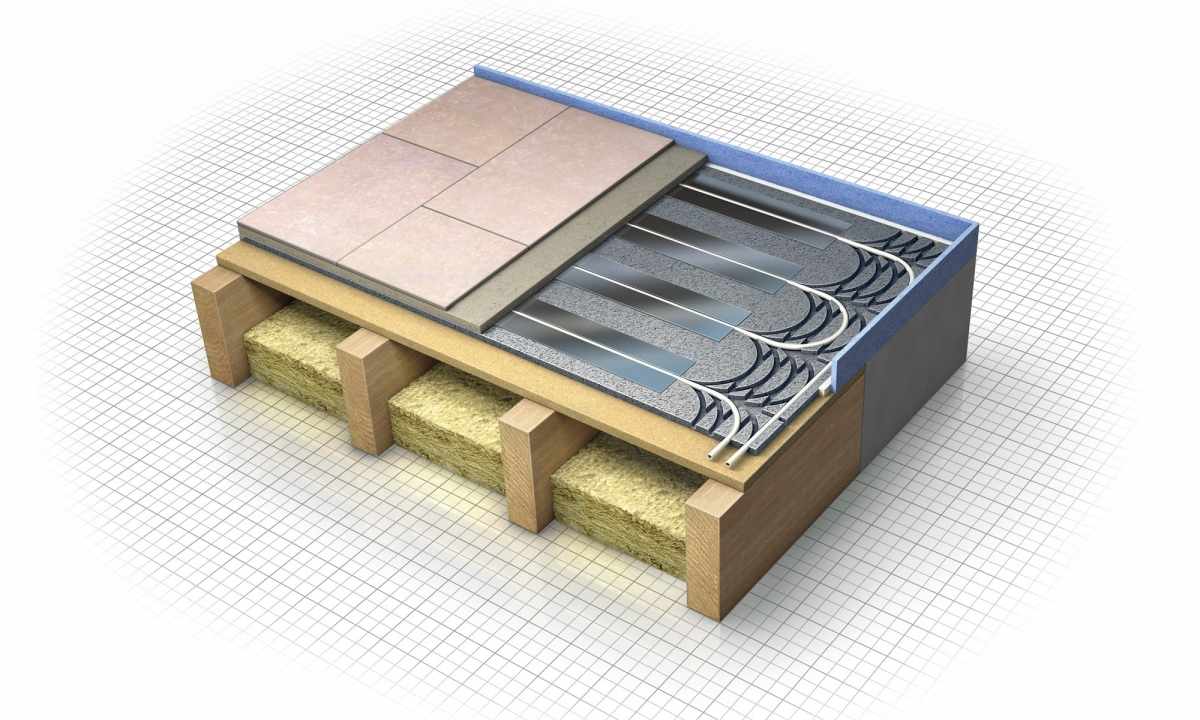
6. At the device of water heat-insulated floor lay on the armoring lattice or the special substrate replacing it heatreflecting polozhka with the seamy surface serving for convenience of laying of the plastic pipeline. On perimeter of the room put damping tape which will have to compensate expansion of tie at its heating.
7. Lay on grid or corrugated substrate the plastic pipeline (as option – from the sewed mm Ø16 polyethylene). The most optimum scheme of laying – spiral, going from the center. The pipeline is folded double, the bend (middle) lays down in the center and around it on spiral both ends of hose keep within. Distance between pipes sustain equal about 200-300 mm, pipe and wall – 100-150 mm. To armoring lattice pipe you fix wire, on corrugated substrate stack it between special ledges.
8. Fix on wall in the convenient location collector and connect to it the pipeline. Connect collector to gas boiler and test system, having pumped in it hot water. If heating of the pipeline happens evenly, and leaks are not observed, everything means it has been made correctly.
9. Lay tie over the pipeline. Its thickness has to be such that pipes disappeared in it completely. Having given time to tie to stiffen, lay over it floor covering.