Connection of the electric meter – business the difficult and demanding involvement of experienced experts. However those who have skills of mounting of electric equipment can try to install the device by the hands. In that case supervisory authorities will need only to check correctness of mounting, connection of the electric counter and to execute its sealing.
Types of electric counters
Upon purchase of the counter for independent connection it is necessary to make sure that the chosen model is allowed for operation. There are several types of metering devices. As loading distinguish single-phase (three-wire) and three-phase (three- and four-wire) models. In apartments and owner-occupied dwellings the first as household appliances work from single-phase network of 220 V are used.
Electric counters also differ on basis of design and are induction and electronic. Electronic are more reliable, compact and more exact (class of accuracy 0.5-2.0), now they force out induction metering devices.
As interfaces distinguish the following:
- pulse,
- GSM,
- RS 232,
- RS 485,
- PLC modem,
- having the IR-port.
If the counter has to be installed out of rooms, it is better to buy the device with the electromechanical reading device. The fact is that at low ambient temperatures the liquid-crystal displays do not display information.
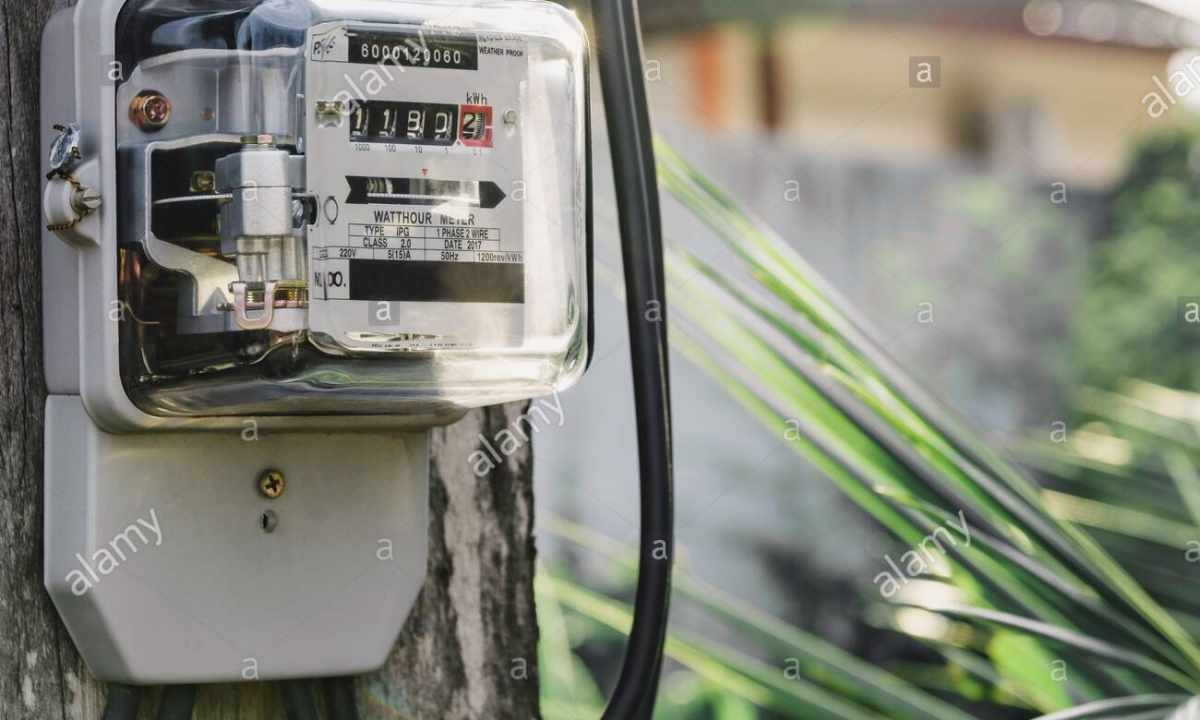
The chosen single-phase counter has to correspond to the loading specified in technical conditions. Before purchase of the device make sure that in documents the stamp of Quality Department is put down. On the body of the counter there has to be seal, the terminal cover will be sealed by the specialist of the power supplying company after mounting and connection.
Rules of installation of the electric counter
Before beginning installation of the metering device, it is necessary to study the Regulation for Electrical Installation (REI). Main requirements:
- The electric meter has to be installed at the height of 0.8-1.7 m.
- For the device installed on the street it is necessary to provide protection against influence of the atmospheric phenomena. For this purpose it is necessary to get the special box from nonflammable plastic which has to be hermetic. On the contrary the board has to be glass.
- The counter is connected by means of copper wires with a minimum section of 2.5 mm2 (information is provided in the specification). Section has to be corresponding to the maximum current capacity.
- For mounting it is necessary to use insulated wires which have no twists or branches.
In multifamily house the counter can be installed on stair landing (in guard) or in the apartment (nearby at door). The installation site is usually regulated by the project. When mounting the electric meter in owner-occupied dwelling it is necessary that wires were looked through visually.
Consider that all works need to be performed at the disconnected tension. Face values of autoswitches and DPS (devices of protective shutdown) have to be picked up by the competent expert.
Components, tools
Mounting of the single-phase electric meter will require spare parts:
- The boxing having degree of protection is not less IP54 (for installation on the street).
- DIN rail.
- Equipment for protection of wiring. Treat it: time cut-outs (automatic machines), DPS (device of protective shutdown). Face values and the necessary quantity are specified in the project of power supply of the apartment or house.
- Bipolar automatic machine switch. It needs to be established to the counter, it provides protection of the device against overloads, gives the chance to carry out service. The face value of the switch is specified in the specification.
- Special tires, mount them on DIN rail or in specially allotted places. These spare parts use in electric boards for distribution of zero conductor and earth wire.
- Assembly copper wire (monovein, PV-1 brand). It is necessary for connection of components.
- Fastening elements (dowel, screws, nuts, self-tapping screws). Are required for fastening of boxing, electric board on wall and on other building constructions and also for mounting of the counter, DIN rails, tires in guard.
Spare parts have to be qualitative, safety of operation of electric equipment and devices depends on it.
To install the counter, it is necessary to prepare several tools:
- perforator,
- flat-nose pliers,
- nippers,
- isolation remover,
- construction knife,
- screw-drivers (indicator and normal),
- ruler,
- construction level,
- tape measure.
Features of the scheme of connection
All single-phase counters are connected equally - directly in power chain (consistently). The scheme is usually specified in the passport or is on the metering device. It looks as follows:
- input voltage is 220 V;
- metering device (counter);
- voltage output is 220 V;
- circuit breaker;
- coupling box;
Any model of single-phase electric counters has 4 terminals which are necessary for connection of wiring. The first – the phase coming the 2nd – the phase leaving the 3rd – zero coming the 4th – zero leaving. That is, the phase wire connects to terminal 1, zero - to terminal 3, tension is connected to electrical wiring from terminals 2 and 4.
Installation of the new device instead of old
To remove the old counter, disconnect input voltage on the device and execute rasplombirovaniye. Then remove terminal cover and by means of the screw-driver indicator check availability/lack of tension. Disconnect all 4 wires by means of the screw-driver. Further remove the counter.
Install the new device upside-down. Fix it instead of old, then connect 4 wires on device terminals. Close terminal cover. Check operation of the counter. For this purpose give tension and turn on some household appliance.
How to install the counter on the new place
It will be slightly more difficult to install the single-phase electric counter on the new place. Operations procedure:
- At first choose metering device installation site. Then check availability/lack of tension.
- Execute place marking where the guard/box for the electric meter will be established. The most convenient for installation, other works, removal of indications height of 1.6-1.7 m is.
- The perforator make openings in wall or other building construction.
- Insert dowels and hang up boxing. That it hung exactly, at its mounting use level.
- If there is need, establish in DIN rail guard. Previously they should be marked and cut off to the necessary size by means of hacksaw.
- Execute installation of the electric counter by means of fastening elements (screws with nuts).
- Mount automatic machines switches, OUZO by means of latches, special fixers.
- Fix the received design on basic insulators, using fastening elements.
- Install the tires necessary for fastening of the grounding, protective wires on basic insulators. Fix them on DIN rail. Between them there has to be small distance, it prevents short circuit.
- Establish input - the bipolar automatic machine. It is recommended to be mounted in other mini-boxing which the specialist of the electrosupplying organization also has to seal.
- Execute input of cables: feeding and loadings. In case the counter is installed on the street, use threaded glands or glands from rubber. They do not allow moisture to get inside. Cut rubber glands with knife, threaded – tighten after via them the wire is passed.
- Undress the ends of wires special purpose tool or sharp knife. Pay attention to the next moment: at cut of cover the cable insulation should not be damaged. If glands are used, input of wire via them has to be in cover. Then it is necessary to recede 2-3 cm and to cut the remained cable length.
- Leave stock of water and load wires in guard (is twice more, than it is necessary). It gives the chance of repeated mounting. Wires need to be stacked accurately that there were no breaks.
- Check belonging of wires to phase, zero working and protective. It needs to be made before connection of input to the bipolar automatic machine switch. As a rule, at phase wire isolation of red or brown color, at working zero – blue, protective zero – flavovirent color.
Color of isolation can
- sometimes be another therefore it is better to make check the screw-driver indicator. For this purpose smooth out isolation on 1 cm, part wires on safe distance and include tension, checking the indicator wire. Then by means of multimeter check tension between phase wire, zero working and protective which makes 220-230B. Then disconnect tension.
- Connect cables to the metering device: at first two to "exit", i.e. on the 2nd and 4th terminals. Then connect the cables which are going out of the electric meter on the general time cut-out which gives tension on electroconsumers. Further connect cables on the 1st and 3rd terminals (on counter "entrance").
For mounting bring each of cables to the terminal and tighten the first (top) screw. Check reliability of fastening. For this purpose pull for cable. Further tighten the second (lower) screw, wait some time and tighten screws once again.
On completion phase connect wires of loadings to automatic machines switches, and then zero, grounding to the corresponding tires. Then check correctness of assembly. It is recommended to entrust it to the experienced construction electrician.
If the single-phase counter is installed correctly, invite the specialist of the power supplying organization. It has to execute sealing of the introduction automatic machine switch and electric meter and to draw up the relevant statement. As a rule, all works from installation of the metering device before drawing up documents are carried out by the representative of the power supplying organization. If mounting and connection are carried out by the hands, before sealing ask the expert to check correctness of connection of the electric meter. It will allow to avoid various misunderstanding. After sealing it is possible to use the new metering device quietly.