The bed is the integral piece of furniture and therefore modern shops represent it in good selection. But in accordance with the circumstances not always people have opportunity to get the pleasant model. In this case it is possible to try to make the bed satisfying to all necessary parameters, the hands.
To do furniture by the hands becomes the fashionable direction. And every year the number of such handymen who are keeping up to date increases. They have many interesting ideas on production in house conditions of necessary subject in each family – bed. But at the same time some masters prefer easier option – to collect bed from preparations, others try to take in hand completely all process – from measurements before finishing. And at the same time it is not important what way each of them will choose for himself: the main thing that the master puts in such furniture also part of the soul. Besides, such useful hobby will help to save considerably the family budget, production of bed own hands will cost much more cheaper its purchases in shop.
So, if you have decided to try the hand and to make bed, previously it is worth defining what model you want and what sizes. In work also the used material is of great importance.
Such different beds
By the size of bed subdivide on:
- single (with width of berth from 80 to 100 cm),
- polutoraspalny (their width is from 120 to 160 cm,
- double (width of their berth from 160 to 200 cm).
Also there are beds of the royal size which width is over 200 cm. There are also non-standard models: such beds differ in form: they are round, oval, square and semicircular, and to the sizes, misfitting to the standard standards.
Quite often designers try to unite several functions in normal bed. For example, having equipped it with drawers for storage of sleeping accessories or things. Transforming beds, suspended beds, beds podiums help to save space.
Depending on model the transforming beds can imitate bulky clothes locker or turn into compact dresser, curbstone with table-top. Such models are especially convenient for the children's room or reserve berth which is quickly equipped in case of arrival of guests. The bed with drawers can become good alternative to cabinet. Except clothes and linen, it is convenient to store children's toys in such models, without encumbering space. The suspended bed is simple in production and is very convenient in use. Rocking on it, it is possible to have a rest and relax well. The only requirement for installation of such design is sufficient free space that the bed could be shaken quietly in the certain amplitude range. For the small apartment it is possible to use such option of bed as podium. Plus of such design is that the berth can be removed for day time under podium, and to equip free space under workplace.
Apparently from the aforesaid, there is a lot of models of beds and therefore before starting its production by the hands, it is necessary to be defined that finally you want to receive. And if it is your first experience on production of furniture, it is desirable to begin with the simplest options.
Preparatory work
Before work choose suitable model. Prepare material, necessary for work. If you already have available mattress which you are going to stack on bed, measure its sizes. Also will depend on it what will be future bed. The fact is that the mattress has to "fit" into its framework most precisely. Therefore it is the best of all to begin production of furniture with acquisition of mattress.
The instruction for creation of standard polutoraspalny bed is offered to your attention. For it the size of mattress has to be about 150х200 cm. If these sizes differ from offered in this instruction, then before work the master needs to make necessary adjustments at cut of timber.
Materials for bed
Will be necessary for construction of bed:
- 4 boards of 2.5×20×240 cm (it is the best of all to use pine) for production of frame,
- 3 boards of 5×10х240 cm for production of supporting beams,
- 1 bar of 10×10×240 cm for legs,
- 19 boards of 2.5×7.5×240 cm for rack bottom,
- 3 boards of 2.5×5×240 cm for decorative finishing.
Primas to purchase choose boards with the minimum quantity of knots. For production of frame it is the best of all to use quality wood. For legs it is possible to buy wood of the second grade. The cheapest rails will be suitable for production of furring. Such approach to acquisition of timber will help to reduce expenses considerably.
Tools for work
For work it is necessary to prepare the following materials:
- tape measure,
- clamps,
- device for drilling of openings at an angle (Kreg Jig set),
- drill,
- circular saw,
- glue for tree,
- adjustable measuring square,
- sanding machine,
- abrasive paper,
- acrylic lacquer,
- brushes,
- putty on tree,
- mordant,
- self-tapping screws of 30 mm,
- self-tapping screws of 50 mm,
- self-tapping screws of 60 mm.
Cut of timber
The acquired timber needs to be sawn correctly.
For frame it is necessary to make 2 boards 2.5×20×205 cm and 2 boards of 2.5×20×148.5 cm. 3 boards of 5×10× 202 cm will be necessary for support. Legs require 6 bars of 10×10×10.5 cm. The rack bottom requires 19 boards of 2.5×7.5×148 cm. For decorative finishing of standard bed 2 boards 2.5×5×157.5 cm and 1 board of 2.5×5× 202 cm are necessary. For finishing of bed couch prepare 2 boards of 2.5×5×150 cm and 1 board of 2.5×5×209.5 cm.
Production of frame of bed
Collect frame from previously prepared boards. Fasten the making boards, having twisted from within at an angle 30-millimeter self-tapping screws. Best of all for this purpose to use the Kreg Jig tool. Slee is absent it, it is possible to fasten frame parts by means of metal corners. Check correctness of connection of boards the square.
By means of mini-plane or the grinder process edges of design, having given them accurate look. Apply joiner's glue on position of joints and fasten boards with self-tapping screws. Until glue has dried, remove its surplus damp rag. Then paint frame, having processed it mordant and acrylic lacquer.
Production of support for rack bottom
While paint dries, prepare support for rack bottom. For this purpose in rails of 5х10 cm drill opening guides, having measured 5 cm from the beginning of bar, and then having put tags through each 25 cm. When the frame completely dries, put it sideways and attach to it the prepared bars. Place bars on the place intended to it and fix by self-tapping screws (50 mm) on the ends and in the center. Press bar on all clamps. Also fasten self-tapping screws in other previously prepared openings. Make the center supporting girder of bar of 5х10 cm. Make two directing openings on one end of bar and one opening – on another. Enclose under prop bar. Apply glue and fasten design with self-tapping screws.
Fill all openings with putty on tree. Wait for drying then grind the processed places abrasive paper with fine grain.
Production of legs of bed
For legs prepare 6 bars 10.5 cm long and with a section of 10Х10 cm. Grind preparations. Then for arrangement of the central legs since each end of supporting beam measure 50 cm (its 1/4 full lengths). Drill in each leg opening guides drill of 2.5 mm, it will allow to reduce risk of splitting of wood and to facilitate process of screwing of self-tapping screws. Attach legs symmetrically to frame.
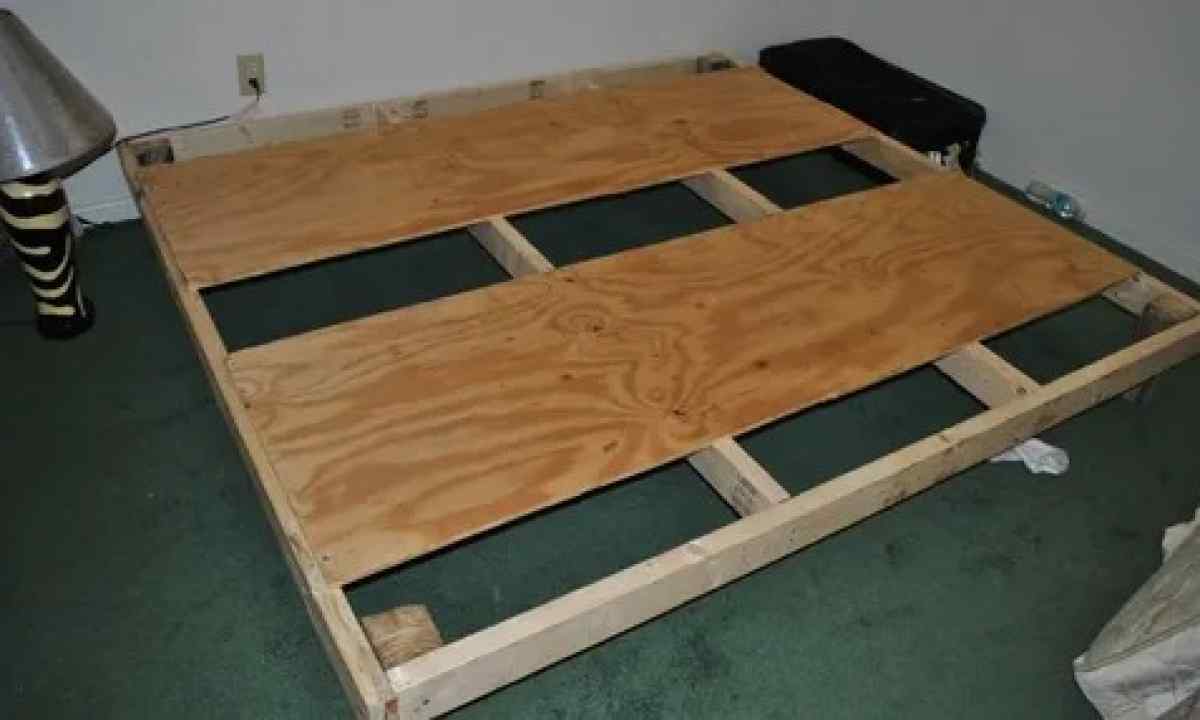
Fixing of rails of bottom and finishing
When the framework of bed and finishing are complete, start fixing of rails of bottom. For this purpose it is convenient to use pneumatic hammer and nails (30 mm). Also them it is possible to fix screws, parquet nails or "to put" on glue. Distribute rails evenly. For convenience it is possible to use between rails insert from unnecessary scrap of board or bar.
Execute decorative finishing of bed, having sewn to headboard and in legs in advance prepared boards. Your bed is ready.